Default version of Python on Rocky Linux 8

Some questions came up at work today about the default version of Python on Rocky Linux 8. Someone said it was Python 3.6.8, others said it was Python 3.9.

I decided to test this empirically and install Rocky Linux 8.10 from the minimal ISO. The answer is:

You’re all wrong. There is no default version of Python on Rocky Linux 8. (At least, not on the minimal ISO, i.e. Rocky-8.10-x86_64-minimal.iso.)

There is, however, platform-python. Rocky Linux needs Python as a dependency for various other tools. That version is, in fact, Python 3.6.8:

[root@localhost ~]# dnf info platform-python
Last metadata expiration check: 0:24:11 ago on Tue 11 Jun 2024 05:49:30 PM EDT.
Installed Packages
Name         : platform-python
Version      : 3.6.8
Release      : 62.el8_10.rocky.0
Architecture : x86_64
Size         : 40 k
Source       : python3-3.6.8-62.el8_10.rocky.0.src.rpm
Repository   : @System
From repo    : anaconda
Summary      : Internal interpreter of the Python programming language
URL          : https://www.python.org/
License      : Python
Description  : This is the internal interpreter of the Python language for the system.
             : To use Python yourself, please install one of the available Python 3 packages,
             : for example python36.

As the description mentions, if you, as a user of the Linux system, want to run Python, you’ll need to install it. Rocky Linux provides several packages:

[root@localhost ~]# dnf install python
Last metadata expiration check: 0:30:25 ago on Tue 11 Jun 2024 05:49:30 PM EDT.
No match for argument: python
There are following alternatives for "python": python2, python3.11, python3.12, python36, python38, python39
Error: Unable to find a match: python

I decided to install all of the versions offered. After installing, I checked the version of each:

[root@localhost ~]# python --version
-bash: python: command not found
[root@localhost ~]# python2 --version
Python 2.7.18
[root@localhost ~]# python3 --version
Python 3.6.8
[root@localhost ~]# python3.8 --version
Python 3.8.17
[root@localhost ~]# python3.9 --version
Python 3.9.19
[root@localhost ~]# python3.11 --version
Python 3.11.7
[root@localhost ~]# python3.12 --version
Python 3.12.1

There is no default python, although you can easily create that alias/link:

[root@localhost ~]# ln /usr/bin/python3.12 /usr/bin/python
[root@localhost ~]# python --version
Python 3.12.1

However, it appears that Rocky 8 will make Python 3.6.8 the target of the python3 alias/link if it is installed. I am basing this claim on the following:

  1. I uninstalled all python3* versions: dnf remove python36 python38 python39 python311 python312
  2. I installed python312. python --version showed Python 3.12.1
  3. I installed python36. python --version showed Python 3.6.8
  4. I installed python39. python --version still showed Python 3.6.8

That suggests it’s not just the most-recently installed Python 3 version that becomes the target of the python3 link. Python 3.6.8, if installed, seems to take precedence over other versions (or at least other versions won’t overwrite the link).
Extracting links from Google Sheets

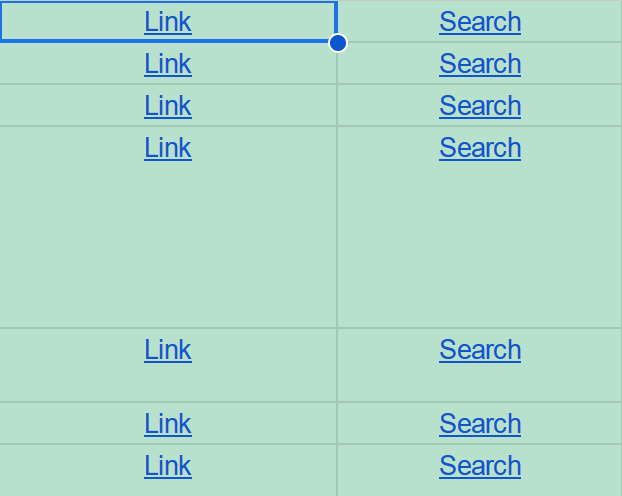
I was working with a shared Google Sheet at work and ran into this:

An excerpt of a Google Sheet. Each row contains a cell with a hyperlink labeled Link
An excerpt of a Google Sheet. Each row contains a cell with a hyperlink labeled Link, but the actual URL is not displayed.

I get it, URLs can be long and messy. We want narrow columns that look clean, not cluttered. But I wanted to analyze the URLs and search for certain content and patterns, which were hidden from me behind the link text.

How can I extract all the URLs?
Continue reading Extracting links from Google Sheets

Hosting a static site on AWS using S3 and CloudFront

A few years ago, Michael Berkowski gently scolded me for hosting a site on HTTP — not HTTPS. I decided that the easiest way to fix this (ignoring Let’s Encrypt for now) was to instead host the site, a static site that hasn’t been updated in years, on AWS. Specifically, to host the site using S3 and CloudFront.

The domain was redbuswashere.com, related to a road trip adventure that didn’t go exactly as planned.

Since that time, I’ve migrated several other sites to AWS, using S3 to store the files and CloudFront as the front-end CDN. I’ve learned a few things in the process, including several of the things that can go wrong. I’ve also created a YouTube video on the process, for people who want to see this step-by-step: Hosting a Static HTML Site on AWS S3.

Continue reading Hosting a static site on AWS using S3 and CloudFront

DirectoryIndex on a static HTML site hosted by AWS

Apache’s mod_dir has a DirectoryIndex option so that if you request a directory, it can return the index document for that directory. For example:

https://www.example.com/dir/ would return https://www.example.com/dir/index.html

The directive typically looks something like this:

DirectoryIndex index.html index.cgi index.pl index.php index.xhtml index.htm

(It’s been many years since I’ve seen index.cgi and index.pl!)

When I recently converted a WordPress site to a static site and hosted it via AWS CloudFront backed by AWS S3 buckets, I found that directory indexes didn’t work. A request for https://www.example.com/dir/ would return a 403 Forbidden error.

StackOverflow to the rescue (and a question from 2015, no less): How do you set a default root object for subdirectories for a statically hosted website on Cloudfront? included several possible solutions.

The solution I liked best was to deploy a pre-built Lambda function that implements similar functionality: standard-redirects-for-cloudfront.

Note that the instructions guide you to get the ARN from the CloudFormation output panel. This is important, as it is not just the ARN but also an appended version number. (In my case it was the ARN followed by :1.) Otherwise you’ll get the following error when adding it to the Origin request section of the CloudFormation behavior:

The function ARN must reference a specific function version. (The ARN must end with the version number.)

Minor improvements to legacy Perl code

We’re always working with code we didn’t write. You’ll spend far more time looking at code you didn’t write (or don’t remember writing) than you will spend writing new code.

Today I looked at an example Perl script that used 45 lines of code to pull the company associated with an OUI (Organizationally Unique Identifier) from a text file, given a MAC address.

I thought I could do slightly better.

find_mac_co.sh:

#!/bin/sh
OUI=$(echo "$1" | sed 's/[^A-Fa-f0-9]//g' | cut -c1-6)
awk -F "\t" -v IGNORECASE=1 -v OUI="$OUI" '$0 ~ OUI { print $3 }' ouidb.tsv
exit 0

Example run:

$ sh find_mac_co.sh 7c:ab:60:ff:ff:ff
Apple, Inc.

There’s probably a way to make the Perl version shorter too. I’m more familiar with bash and shell commands.

The biggest problem with this script is that it relies on an up-to-date list of OUIs. An even better way is to query an API:

find_mac_co_api.sh

#!/bin/sh
MACADDRESS="$1"
curl "https://api.maclookup.app/v2/macs/$MACADDRESS/company/name"
exit 0

Example run:

$ sh find_mac_co_api.sh 7c:ab:60:ff:ff:ff
Apple, Inc.

Renaming multiple files: replacing or truncating varied file extensions

In the previous post, I ran into an issue where Wget saved files to disk verbatim, including query strings/parameters. The files on disk ended up looking like this:

  • wp-includes/js/comment-reply.min.js?ver=6.4.2
  • wp-includes/js/jquery/jquery-migrate.min.js?ver=3.4.1
  • wp-includes/js/jquery/jquery.min.js?ver=3.7.1
  • wp-includes/css/dist/block-library/style.min.css?ver=6.4.2

I wanted to find a way to rename all these files, and truncate the filename after and including the question mark. As an example, to convert jquery.min.js?ver=3.7.1 to jquery.min.js.

Continue reading Renaming multiple files: replacing or truncating varied file extensions

Converting a WordPress site to a static site using Wget

I recently made a YouTube tutorial on converting a WordPress site to a static HTML site. This blog post is a companion to the video.

First of all, why convert a WordPress site to a static HTML site? There are a number of reasons, but my primary concern is to reduce update fatigue. WordPress software, along with WordPress themes and plugins, have frequent security updates. Many sites have stable content after an initial editing phase, the need to apply never-ending security updates for a site that doesn’t change doesn’t make sense.

The example site I used in the tutorial is www.stress2012.com, a site for an academic conference/workshop that was held in 2012. It’s 2024: the site content is not going to change.

To mirror the site, I used Wget with the following command:

Continue reading Converting a WordPress site to a static site using Wget

3 ways to remove blank lines from a file

There are certainly more than 3 ways to do this. Typically I’ve always used sed to do this, but here’s my method using sed and two other methods using tr and awk:

sed:

sed '/^$/d' file_with_blank_lines

tr:

tr -s '\n' <file_with_blank_lines

awk:

awk '{ if ($0) print $0 }' file_with_blank_lines

If you have other favorite ways, leave a note in the comments!

Migrating database servers

As I’m migrating websites and applications from one server to another, I’m also migrating databases from one server to another.

Even though I’ve done this dozens, if not hundreds, of times, I always find myself looking up how to do this. I’m migrating from one MySQL (MariaDB) servers to another MySQL (MariaDB), so relatively straightforward but still some command syntax I don’t remember off the top of my head.

First, export the old database to a file:

DBHOST=old-db-host.osric.com
DBUSER=dbusername
DBNAME=dbname
mysqldump --add-drop-table -h $DBHOST -u $DBUSER -p $DBNAME >$DBNAME.07-NOV-2023.bak.sql

The this mysqldump command produces output that will re-create the necessary tables and insert the data.

In this case I’m not compressing the output, but it would be trivial to pipe the output of mysqldump to a compression utility such as xz, bzip2, or gzip. For my data, which is entirely text-based, any of these utilities performs well, although xz achieves the best compression:

mysqldump --add-drop-table -h $DBHOST -u $DBUSER -p $DBNAME | xz -c >$DBNAME.07-NOV-2023.bak.sql.xz
mysqldump --add-drop-table -h $DBHOST -u $DBUSER -p $DBNAME | bzip2 -c >$DBNAME.07-NOV-2023.bak.sql.bz2
mysqldump --add-drop-table -h $DBHOST -u $DBUSER -p $DBNAME | gzip -c >$DBNAME.07-NOV-2023.bak.sql.gz

Next, create the new database and a database user account. This assumes there is a database server running:

sudo mysql -u root
CREATE DATABASE dbname;
CREATE USER 'dbuser'@'localhost' IDENTIFIED BY 'your-t0p-s3cr3t-pa55w0rd';
GRANT ALL PRIVILEGES ON dbname.* TO 'dbuser'@'localhost';

Note that the CREATE USER and GRANT PRIVILEGES commands will result in a “0 rows affected” message, which is normal:

Query OK, 0 rows affected (0.002 sec)

There are other ways to create the database, see 7.4.2 Reloading SQL-Format Backups in the MySQL documentation.

Next, import the database from the file. This example uses the root user because I did not grant the dbuser PROCESS privileges (which are not table-level privileges):

sudo mysql --user=root --host=localhost dbname <dbname.07-NOV-2023.bak.sql