IPBan’s ProcessToRunOnBan functionality

The IPBan config file contains 2 interesting items that can trigger actions when IP addresses are banned or unbanned: ProcessToRunOnBan and ProcessToRunOnUnban.

Here’s the default config entry for ProcessToRunOnBan:


<add key="ProcessToRunOnBan" value=""/>

I decided I wanted to make the list of banned IP addresses public by writing to a web-accessible file. I tried adding the following values:


<add key="ProcessToRunOnBan" value="%SystemRoot%\system32\WindowsPowerShell\v1.0\powershell.exe C:\add-bannedip.ps1|###IPADDRESS###"/>

<add key="ProcessToRunOnUnban" value="%SystemRoot%\system32\WindowsPowerShell\v1.0\powershell.exe C:\remove-unbannedip.ps1|###IPADDRESS###"/>

The PowerShell (.ps1) scripts were really simple. The first adds banned IPs to a text file within the web root:

# Add an IP address to the list of banned IPs
param ($BannedIP)

$BannedPath = 'C:\inetpub\wwwroot\banned.txt'
Add-Content -Path $BannedPath -Value $BannedIP

The next removes unbanned IPs from the same text file:

# Remove an IP address from the list of banned IPs
param ($UnbannedIP)

$BannedPath = 'C:\inetpub\wwwroot\banned.txt'
Set-Content -Path $BannedPath (Get-Content $BannedPath | Select-String -NotMatch $UnbannedIP)

There are some flaws and a lack of error-checking in the above. The un-ban script could match IP addresses that are not identical, for example: 192.0.2.1 would match 192.0.2.10 and 192.0.2.100. Additionally, I would want to confirm that the parameter value was a valid IP address, but this was just a quick proof-of-concept.

However, I encountered an error when the next IP address was banned:

2022-01-03 00:51:35.8763|ERROR|DigitalRuby.IPBanCore.Logger|Failed to execute process C:\Program Files\IPBan\%SystemRoot%\system32\WindowsPowerShell\v1.0\powershell.exe C:\add-bannedip.ps1 192.0.2.14: System.ComponentModel.Win32Exception (2): An error occurred trying to start process 'C:\Program Files\IPBan\%SystemRoot%\system32\WindowsPowerShell\v1.0\powershell.exe C:\add-bannedip.ps1' with working directory 'C:\Program Files\IPBan\%SystemRoot%\system32\WindowsPowerShell\v1.0\powershell.exe C:'. The system cannot find the file specified.
   at System.Diagnostics.Process.StartWithCreateProcess(ProcessStartInfo )
   at System.Diagnostics.Process.StartCore(ProcessStartInfo )
   at System.Diagnostics.Process.Start()
   at System.Diagnostics.Process.Start(ProcessStartInfo )
   at DigitalRuby.IPBanCore.IPBanService.<>c__DisplayClass191_0.<ExecuteExternalProcessForIPAddresses>b__0() in C:\Users\Jeff\Documents\GitHub\DigitalRuby\IPBan\IPBanCore\Core\IPBan\IPBanService_Private.cs:line 591

It apparently failed to expand %SystemRoot%, so I replaced it with C:\Windows.

As mentioned in my previous post on IPBan (IPBan: fail2ban for Windows), I am using a remote config file hosted on an HTTPS server. Shortly after I made the change on the remote server, I noticed this in the logs (logfile.txt):

2022-01-03 01:36:43.3348|INFO|DigitalRuby.IPBanCore.Logger|Config file changed

It looks like IPBan automatically checks the GetUrlConfig value for updates. I confirmed that the file at C:\Program Files\IPBan\ipban.config was updated at the same time. This is excellent, previously I thought I might need to restart the IPBan service any time the configuration changed.

Unfortunately, my change still didn’t work. I encountered the following error:

2022-01-03 14:22:21.7154|ERROR|DigitalRuby.IPBanCore.Logger|Failed to execute process C:\Windows\system32\WindowsPowerShell\v1.0\powershell.exe C:\add-bannedip.ps1 192.0.2.208: System.ComponentModel.Win32Exception (2): An error occurred trying to start process 'C:\Windows\system32\WindowsPowerShell\v1.0\powershell.exe C:\add-bannedip.ps1' with working directory 'C:\Windows\system32\WindowsPowerShell\v1.0\powershell.exe C:'. The system cannot find the file specified.
   at System.Diagnostics.Process.StartWithCreateProcess(ProcessStartInfo )
   at System.Diagnostics.Process.Start(ProcessStartInfo )
   at DigitalRuby.IPBanCore.IPBanService.<>c__DisplayClass191_0.<ExecuteExternalProcessForIPAddresses>b__0() in C:\Users\Jeff\Documents\GitHub\DigitalRuby\IPBan\IPBanCore\Core\IPBan\IPBanService_Private.cs:line 591

I decided to take a closer look at line 591:

    ProcessStartInfo psi = new()
    {
        FileName = programFullPath,
        WorkingDirectory = Path.GetDirectoryName(programFullPath),
        Arguments = replacedArgs
    };
    using Process p = Process.Start(psi);

It looked to me like it was taking the path for the PowerShell executable and the PowerShell script both as the full path. I changed the config to pass in the path to the PowerShell script as part of the arguments, which made sense:

<add key="ProcessToRunOnBan" value="C:\Windows\system32\WindowsPowerShell\v1.0\powershell.exe|C:\add-bannedip.ps1 ###IPADDRESS###"/>

That worked! The next time an IP address was banned, the .ps1 script was run and added the IP address to a web-accessible file.
Setting a static IP, default gateway, and nameservers via PowerShell

I needed to set up a number of Windows server VMs (Windows 2012R2) as a test bed for a vulnerability scanning suite. This would have been fast & easy using AWS EC2 instances (or Azure!), but I decided to use my internal VMWare infrastructure instead.

For CentOS VMs I would typically use one of three things to configure the static IP, gateway, and default nameservers:

  • nmtui (a text user interface to the network manager)
  • the interactive installer
  • a custom kickstart file

How to accomplish the same thing on Windows 2012R2? In particular, I was looking for Powershell commands, since I would be connecting over a web-based console.
Continue reading Setting a static IP, default gateway, and nameservers via PowerShell

Pipe array to Powershell script

I created a Powershell script to set a few mailbox properties. I wanted to pipe in an array of mailbox objects, i.e. the results of a Get-Mailbox command, like so:

$Mailboxes | C:\Set-MailboxProperties.ps1

However, Set-MailboxProperties.ps1 only processed the first item in the array.

Via Google I found this helpful StackOverflow post, How to pass an array as a parameter to another script? Although the answers did not include an example exactly like mine, their solution works just the same:

(,$Mailboxes) | C:\Set-MailboxProperties.ps1

PowerShell Ellipsis (dot dot dot)

Sometimes when you retrieve an object via PowerShell, some of the properties are truncated, denoted by an ellipsis (“…”).

For example:
Get-Mailbox chris | Select AddressListMembership

AddressListMembership
---------------------
{\Staff Global Address List, \Staff, \IT Staff, \Exchange Admins...}

How do you see the full list? There are a couple ways:

Select -ExpandProperty
Get-Mailbox chris | Select -ExpandProperty AddressListMembership

$FormatEnumerationLimit =-1
This is a per-session variable in PowerShell. By default the value is 4, but if you change it to -1 it will enumerate all items. This will affect every property of every object, so it may be more than you need.

Free/Busy Time Segmentation in Exchange Online

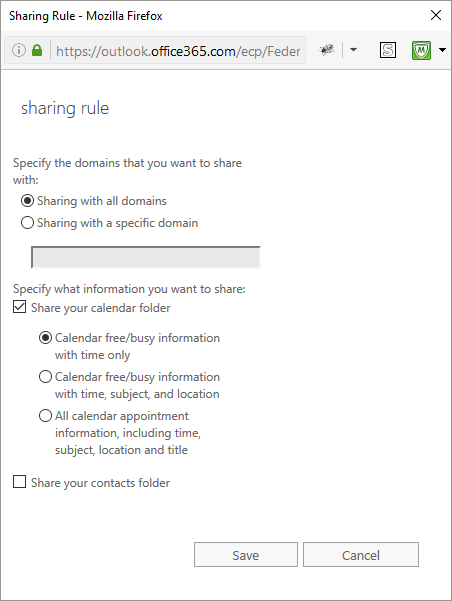
By default, all users in the same Exchange Online environment can view each other’s free/busy time. Using the Organization–Sharing settings you can share more information, but not less.

Exchange Online Sharing Rule
Unchecking the ‘Share your calendar folder’ box does not turn off calendar sharing. Counterintuitive!

Individuals can adjust their own free/busy time sharing in Outlook or Outlook Web App (OWA). But what if you have less-privileged users who should not be able to view another user’s free/busy time, for example, temporary employees or contract workers? Can they be restricted from viewing calendar information for other users?

It can be done, but it’s not simple.

My 3-part approach, summarized:

  1. Change each user’s sharing settings for the Default user to None via PowerShell
  2. Create a mail-enabled universal security group containing all privileged users. (Fortunately, this group already existed within my organization.)
  3. Change each user’s sharing settings for the security group created above to AvailabilityOnly via PowerShell (to allow just Free/Busy visibility)

I found Add Calendar Permissions in Office 365 via Powershell, which was a tremendous help in discovering the format of the calendar folder. For example, to adjust the Default user’s access to chris@example.com’s calendar to None, use the following PowerShell command:
Set-MailboxFolderPermission -Identity chris@example.com:\calendar -user Default -AccessRights None

Then I tried to add permissions for the security group:
$mycal = 'chris@example.com:\calendar'
Set-MailboxFolderPermission -Identity $mycal -User privileged-users-security-group@example.com -AccessRights AvailabilityOnly

Error:
There is no existing permission entry found for user: privileged-users-security-group.
+ CategoryInfo : NotSpecified: (:) [Set-MailboxFolderPermission], UserNotFoundInPermissionEntryException
+ FullyQualifiedErrorId : [Server=BLUPR0101MB1603,RequestId=d057882d-5663-417d-a614-ce73e5ab0565,TimeStamp=3/15/20
16 3:41:20 PM] [FailureCategory=Cmdlet-UserNotFoundInPermissionEntryException] B65CA2A0,Microsoft.Exchange.Managem
ent.StoreTasks.SetMailboxFolderPermission
+ PSComputerName : ps.outlook.com

Thanks to Setup secretary permissions to manage Calendar in Office 365, I discovered that the above error occurred because the security group had no current settings for the specified calendar. In that case, the Add-MailboxFolderPermission is the appropriate command:

Add-MailboxFolderPermission -Identity $mycal -User privileged-users-security-group@example.com -AccessRights AvailabilityOnly

Before running this across all of our users, I wanted to find out which users had customized their free/busy sharing settings. If they had customized them, I wanted to preserve their settings. For example, I decided to get the Default user sharing settings for the sales department users’ calendars:

$DeptMailboxes = Get-Mailbox -Filter {CustomAttribute2 -eq 'sales'}
ForEach ($Mailbox In $DeptMailboxes) { $Calendar = $Mailbox.UserPrincipalName + ":\calendar"; Get-MailboxFolderPermission -Identity $Calendar -User Default}

Unfortunately, the above did not return all of the properties needed to identify the calendars in question:
Calendar Default {AvailabilityOnly}
Calendar Default {LimitedDetails}
Calendar Default {AvailabilityOnly}

I specified a list of properties that was more useful:
ForEach ($Mailbox In $DeptMailboxes) { $Calendar = $Mailbox.UserPrincipalName + ":\calendar"; Get-MailboxFolderPermission -Identity $Calendar -User Default | Select Identity,FolderName,User,AccessRights }

Fortunately, only a handful of the users in my organization had customized their sharing settings, so I simply noted their settings and re-applied them after running these settings across all users in the organization:

$AllMailboxes = Get-Mailbox
ForEach ($Mailbox In $AllMailboxes) { $Calendar = $Mailbox.UserPrincipalName + ":\calendar"; Set-MailboxFolderPermission -Identity $Calendar -User Default -AccessRights None; Add-MailboxFolderPermission -Identity $Calendar -User privileged-users-security-group@example.com -AccessRights AvailabilityOnly }

This achieved the desired free/busy time segmentation. However, there’s one snag: what happens when new users are added? They will have the default sharing settings. That means that every time a new user is added, these steps will need to be run for that new user. I created the following PowerShell script — I can pipe the results of Get-Mailbox to this script to apply the customizations described above:

param(  
    [Parameter(
        Position=0, 
        Mandatory=$true, 
        ValueFromPipeline=$true,
        ValueFromPipelineByPropertyName=$true)
    ]
    [Object[]]$Mailbox
)

Process {
    $Calendar = $Mailbox.UserPrincipalName + ":\calendar"
    Set-MailboxFolderPermission -Identity $Calendar -User Default -AccessRights None
    Add-MailboxFolderPermission -Identity $Calendar -User 'privileged-users-security-group@example.com' -AccessRights AvailabilityOnly
}

To run the script (assuming it is named Set-CustomFreeBusySharing.ps1):
Get-Mailbox -Identity bob@example.com | ./Set-CustomFreeBusySharing.ps1

Fully integrating that into my account creation process is a job for another day.

One other thing to note: users can still choose to modify their free/busy sharing with the Default user, in case they do want/need to share their availability with all users in the organization.

Other sites that had useful information while I researched this issue:

Set-MsolUserLicense : A parameter cannot be found that matches parameter name ‘UsageLocation’

I wanted to apply an Office 365 (O365) license to a user via PowerShell:

PowerShell Command
Set-MsolUserLicense -UserPrincipalName "johndoe@example.com" -AddLicenses "exampletenant:EXCHANGESTANDARD_ALUMNI"

Error
Set-MsolUserLicense : You must provide a required property: Parameter name: UsageLocation

Fine. What is this UsageLocation parameter? See Assign licenses to user accounts with Office 365 PowerShell:

You can assign licenses only to user accounts that have the UsageLocation property set to a valid ISO 3166-1 alpha-2 country code. For example, US for the United States, and FR for France.

OK, so US for United States.

PowerShell Command
Set-MsolUserLicense -UserPrincipalName "johndoe@example.com" -AddLicenses "exampletenant:EXCHANGESTANDARD_ALUMNI" -UsageLocation US

Error
Set-MsolUserLicense : A parameter cannot be found that matches parameter name 'UsageLocation'.

Really, Microsoft? Is it a required parameter or is it not a parameter? Make up your minds!

Turns out, it’s a parameter of the Set-MsolUser cmdlet:

PowerShell Commands
Set-MsolUser -UserPrincipalName "johndoe@example.com" -UsageLocation US
Set-MsolUserLicense -UserPrincipalName "johndoe@example.com" -AddLicenses "exampletenant:EXCHANGESTANDARD_ALUMNI"

The license was applied successfully.

Querying an Oracle database from Powershell

I needed to query Oracle for information to use in a Powershell script. I found the following comprehensive blog post with details on how to do so using ODP.NET: Use Oracle ODP.NET and PowerShell to Simplify Data Access

The article is extremely long and goes into a lot of depth. The following is a short summary of the first steps, with just enough to get started:

  1. Download Oracle Data Provider for .NET (ODP.NET). (If that link doesn’t work just search for “Oracle ODP.NET”.)
    • Select “Download the latest ODP.NET production release.”
    • Select “64-bit ODAC Downloads”
    • Select “ODP.NET_Managed_ODAC12cR4.zip”
  2. Extract the ZIP file to C:\, which creates C:\ODP.NET_Managed_ODAC12cR4.
  3. Run cmd as administrator, navigate to C:\ODP.NET_Managed_ODAC12cR4, and run:
    install_odpm.bat C:\oracle\instantclient_10_2 both

In Powershell, add the DLL and set up a database connection and a query:

Add-Type -Path "C:\Users\chris\ODP.NET_Managed_ODAC12cR4\odp.net\managed\common\Oracle.ManagedDataAccess.dll"
$username = Read-Host -Prompt "Enter database username"
$password = Read-Host -Prompt "Enter database password"
$datasource = Read-Host -Prompt "Enter database TNS name"
$query = "SELECT first_name, last_name FROM users.user WHERE first_name = 'Chris' ORDER BY last_name"
$connectionString = 'User Id=' + $username + ';Password=' + $password + ';Data Source=' + $datasource
$connection = New-Object Oracle.ManagedDataAccess.Client.OracleConnection($connectionString)
$connection.open()
$command=$connection.CreateCommand()
$command.CommandText=$query
$reader=$command.ExecuteReader()
while ($reader.Read()) {
$reader.GetString(1) + ', ' + $reader.GetString(0)
}
$connection.Close()

Output of the above:

Brown, Chris
Carter, Chris
Jones, Chris
Smith, Chris